Assuming you are referring to creating a HTML Encode / Decode Tools using JavaScript, here is a simple example using HTML, CSS, and JavaScript, follow these steps.
1. Create an HTML file and include a basic structure with a head and body tag. You can use the following code as a starting point and Add the CSS and JavaScript files to your HTML document.
<!DOCTYPE html>
<html lang="en">
<head>
<meta charset="UTF-8">
<meta http-equiv="X-UA-Compatible" content="IE=edge">
<meta name="viewport" content="width=device-width, initial-scale=1.0">
<title>HTML Encode / Decode Tools Using JavaScript</title>
<link rel="stylesheet" href="style.css">
<script src="https://democodewithar.000webhostapp.com/v3/encode-decode.js"></script>
</head>
<body>
<script src="script.js"></script>
</body>
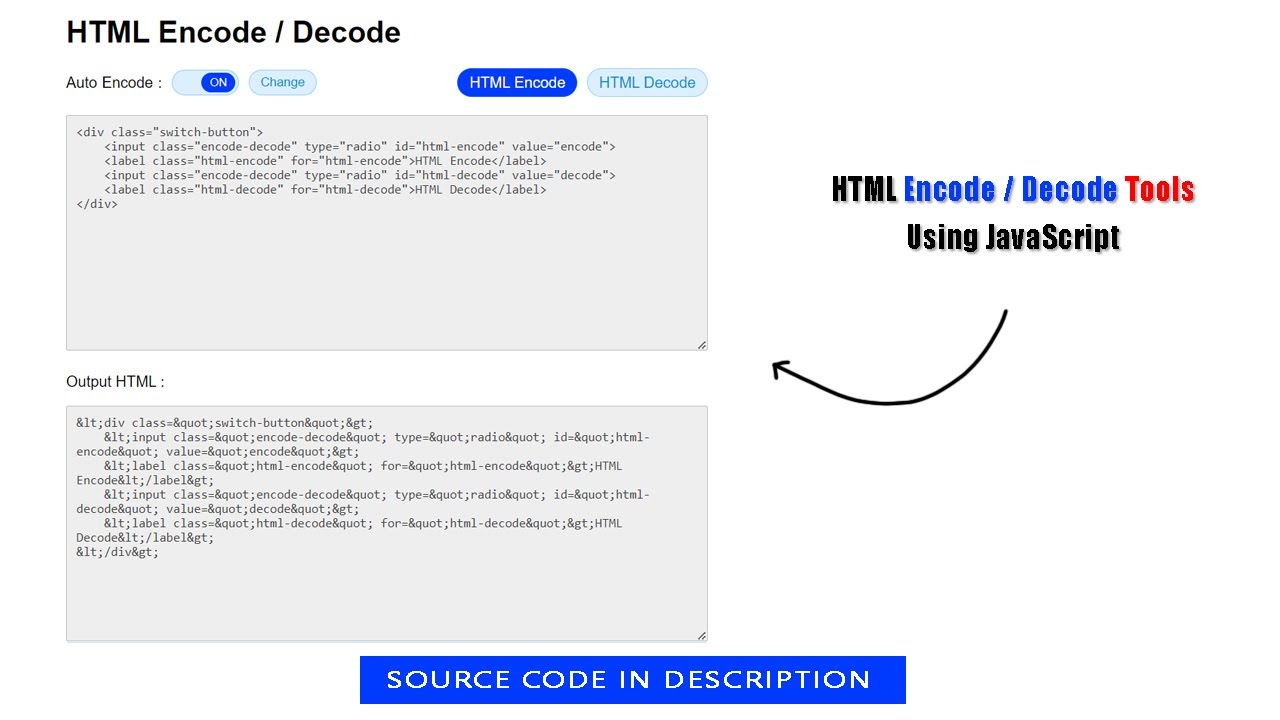
</html>2. Inside the body tag, create a div element with a class of "container".
<div class="container">
    <h1>HTML Encode / Decode</h1>
    <div class="action-button">
        <div class="switch-button">
            Auto <span class="title" >Encode</span> :
            <div class="switch-button">
                <input class="auto" type="checkbox" checked id="auto">
                <label for="auto"></label>
            </div>
            <button class="change">Change</button>
        </div>
        <div class="switch-button">
            <input class="encode-decode" type="radio" checked name="selectOption" id="html-encode" value="encode">
            <label class="html-encode" for="html-encode">HTML Encode</label>
            <input class="encode-decode" type="radio" name="selectOption" id="html-decode" value="decode">
            <label class="html-decode" for="html-decode">HTML Decode</label>
        </div>
    </div>
    <textarea class="enter-data" name="" id="" cols="40" rows="15"></textarea>
    <p style="margin-top: 20px;" >Output HTML :</p>
    <textarea class="output-data" name="" id="" cols="40" rows="15"></textarea>
</div>
3. Create a CSS file and style your HTML Encode / Decode Tools to make it look nice. You can use the following code as a starting point:
body {
    margin: 0;
    padding: 0;
    font-family: sans-serif;
}

.container {
    max-width: 680px;
    width: 95%;
    margin: 0 auto;
}

.switch-button,
.action-button {
    display: flex;
    align-items: center;
    margin: 20px 0;
    height: 28px;
    justify-content: space-between;
}

.switch-button .title {
    margin: 0 5px;
    align-items: center;
}

.switch-button .auto,
.encode-decode {
    position: absolute;
    opacity: 0;
    z-index: -2;
}

.switch-button .title {
    text-transform: capitalize;
}

.switch-button .auto+label {
    position: relative;
    display: inline-block;
    width: 70px;
    height: 26px;
    border-radius: 20px;
    margin: 0;
    cursor: pointer;
    background: #0090ff24;
    margin-left: 10px;
    border: solid 1px #0091ff51;
}

.switch-button .auto+label::before {
    position: absolute;
    content: "OFF";
    font-size: 12px;
    align-items: center;
    text-align: center;
    line-height: 21px;
    top: 2.5px;
    left: 2.5px;
    width: 36px;
    border-radius: 20px;
    background: #fff;
    transition: .3s ease-in-out;
}

.switch-button .auto:checked+label::before {
    left: 31px !important;
    content: "ON";
    background: #003cff;
    color: #fff;
}

.switch-button .change,
.html-encode,
.html-decode {
    padding: 5px 12px;
    margin-left: 10px;
    cursor: pointer;
    user-select: none;
    border: solid 1px #0091ff51;
    background: #0090ff24;
    border-radius: 20px;
    color: #008fd6;
    transition: all 0.3s;
}

.html-encode:active,
.html-decode:active,
.switch-button .change:active {
    border-color: #003cff;
}

.switch-button .encode-decode:checked+label {
    background: #003cff;
    color: #fff;
}

textarea {
    padding: 10px;
    width: -webkit-fill-available;
    border: solid 1px #babfc4;
    outline: none;
    color: #444;
    background: #eee;
    border-radius: 2px;
}

textarea:focus {
    box-shadow: 0 0 0 1px #008fd6;
    border-color: #008fd6;
}
4. Create a JS file. You can use the following code as a starting point:
const ar = codewithar;
const auto = ar.s("auto");
const output = function (data) {
    setTimeout(() =>{
        const output_data = ar.s("output-data");
        let encode = false;

        for (let i = 0, nx = ar.sl("encode-decode", true); i < nx.length; i++) {
          if (nx[i].checked)   encode = nx[i].value;
        }
        if (encode == "encode") {output_data.value = ar.htmlEncode(data)}
        if (encode == "decode") {output_data.value = ar.htmlDecode(data)}
    })
}


const enter_data = ar.s("enter-data");
enter_data.addEventListener("input", function () {
    if(auto.checked) output(this.value);
    else{ar.s("change").on(function () { output(enter_data.value) })}
});

for (let i = 0, nx = ar.sl("label", false); i < nx.length; i++) {
    nx[i].on(function () { output(enter_data.value, this)})
}
for (let i = 0, nx = ar.sl("encode-decode", true); i < nx.length; i++) {
    nx[i].on(function () {  ar.s("title").innerHTML = nx[i].value;})
}
5. Save the file and open it in a web browser to see your HTML Encode / Decode Tools.
Html Code
<script src="https://democodewithar.000webhostapp.com/v3/encode-decode.js"></script>
<div class="container">
    <h1>HTML Encode / Decode</h1>
    <div class="action-button">
        <div class="switch-button">
            Auto <span class="title" >Encode</span> :
            <div class="switch-button">
                <input class="auto" type="checkbox" checked id="auto">
                <label for="auto"></label>
            </div>
            <button class="change">Change</button>
        </div>
        <div class="switch-button">
            <input class="encode-decode" type="radio" checked name="selectOption" id="html-encode" value="encode">
            <label class="html-encode" for="html-encode">HTML Encode</label>
            <input class="encode-decode" type="radio" name="selectOption" id="html-decode" value="decode">
            <label class="html-decode" for="html-decode">HTML Decode</label>
        </div>
    </div>
    <textarea class="enter-data" name="" id="" cols="40" rows="15"></textarea>
    <p style="margin-top: 20px;" >Output HTML :</p>
    <textarea class="output-data" name="" id="" cols="40" rows="15"></textarea>
</div>
Css Code
body {
    margin: 0;
    padding: 0;
    font-family: sans-serif;
}

.container {
    max-width: 680px;
    width: 95%;
    margin: 0 auto;
}

.switch-button,
.action-button {
    display: flex;
    align-items: center;
    margin: 20px 0;
    height: 28px;
    justify-content: space-between;
}

.switch-button .title {
    margin: 0 5px;
    align-items: center;
}

.switch-button .auto,
.encode-decode {
    position: absolute;
    opacity: 0;
    z-index: -2;
}

.switch-button .title {
    text-transform: capitalize;
}

.switch-button .auto+label {
    position: relative;
    display: inline-block;
    width: 70px;
    height: 26px;
    border-radius: 20px;
    margin: 0;
    cursor: pointer;
    background: #0090ff24;
    margin-left: 10px;
    border: solid 1px #0091ff51;
}

.switch-button .auto+label::before {
    position: absolute;
    content: "OFF";
    font-size: 12px;
    align-items: center;
    text-align: center;
    line-height: 21px;
    top: 2.5px;
    left: 2.5px;
    width: 36px;
    border-radius: 20px;
    background: #fff;
    transition: .3s ease-in-out;
}

.switch-button .auto:checked+label::before {
    left: 31px !important;
    content: "ON";
    background: #003cff;
    color: #fff;
}

.switch-button .change,
.html-encode,
.html-decode {
    padding: 5px 12px;
    margin-left: 10px;
    cursor: pointer;
    user-select: none;
    border: solid 1px #0091ff51;
    background: #0090ff24;
    border-radius: 20px;
    color: #008fd6;
    transition: all 0.3s;
}

.html-encode:active,
.html-decode:active,
.switch-button .change:active {
    border-color: #003cff;
}

.switch-button .encode-decode:checked+label {
    background: #003cff;
    color: #fff;
}

textarea {
    padding: 10px;
    width: -webkit-fill-available;
    border: solid 1px #babfc4;
    outline: none;
    color: #444;
    background: #eee;
    border-radius: 2px;
}

textarea:focus {
    box-shadow: 0 0 0 1px #008fd6;
    border-color: #008fd6;
}
JS Code
        const ar = codewithar;
        const auto = ar.s("auto");
        const output = function (data) {
            setTimeout(() =>{
                const output_data = ar.s("output-data");
                let encode = false;

                for (let i = 0, nx = ar.sl("encode-decode", true); i < nx.length; i++) {
                  if (nx[i].checked) {
                     encode = nx[i].value;
                  }
                }

                if (encode == "encode") {output_data.value = ar.htmlEncode(data)}
                if (encode == "decode") {output_data.value = ar.htmlDecode(data)}
            })
        }


        const enter_data = ar.s("enter-data");
        enter_data.addEventListener("input", function () {
            if(auto.checked) output(this.value);
            else{ar.s("change").on(function () {
                output(enter_data.value)
            })}
        });

        for (let i = 0, nx = ar.sl("label", false); i < nx.length; i++) {
            nx[i].on(function () {
                output(enter_data.value, this)
            })
        }
        for (let i = 0, nx = ar.sl("encode-decode", true); i < nx.length; i++) {
            nx[i].on(function () {
                ar.s("title").innerHTML = nx[i].value;
            })
        }